转自
http://www.theserverside.com/tt/articles/article.tss?l=SpringLoadedObserverPattern
This article describes an easy process of implementing the observer pattern in the Spring framework (Spring Core). Also discussed in this article are a few of the Spring Core classes as well as an easy way to start the Spring Framework in any project. Finally, this article shows developers and designers that the Spring framework is a great reason to continue design pattern advocacy in your projects.
Recently, it seems when developers use the Spring framework to improve their projects they focus only on simple object oriented design techniques. Unfortunately some of the more brilliantly researched patterns are forgotten in place of a brilliant framework (Spring). Although the Factory Pattern and the Singleton Pattern are built into Spring, other patterns such as the Decorator Pattern, the Adapter Pattern, and the Observer Pattern are often forgotten because of the new ideas Spring has to offer. Fortunately, design patterns and the Spring framework can exist in the same application. In this article I show how the commonly used Observer Pattern fits nicely in the Spring Framework.
Observer Pattern
The Observer Pattern is also known as a publisher and subscriber design pattern. The pattern is useful when you have one publisher and many subscribers (one-to-many) that are interested in the publisher's state or messages. Additionally, interested subscribers have the ability to register and unregister as they please. Lastly, subscribers are notified of the publisher's messages automatically (that is, by no effort of their own). Figure 1 is an example of a typical observer pattern.
Figure 1. Observer Pattern
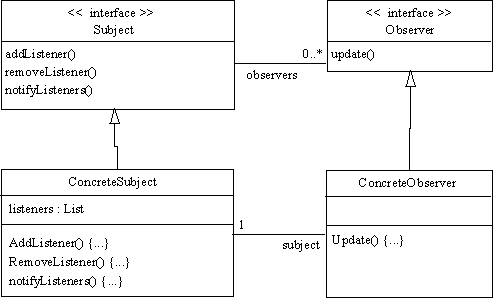
I chose to use a more widely accepted diagram to describe the Observer Pattern so you will notice that the aforementioned publisher is actually the Subject in this diagram. The subscriber is the Observer in the diagram. The intimate details of the Observer Pattern are far outside of the scope of this article, but a note worthy topic is how the Spring framework can be used to leverage good object oriented design techniques while creating the concrete classes of this pattern.
A normal concreteObserver class is required to have code similar to this constructor (or a similar “setter” method to achieve the registering of the Observer with the Subject):
public concreteObserver(Subject s) {
	s.addListener(this);
}
Below you will see how the Spring framework wires the two concrete classes together with XML and not with code inside the classes. Ultimately, this allows the developer to avoid any unnecessary coupling of the concrete classes.
Spring Considerations
Since this article covers only the most simple implementation of the observer pattern, I utilize only the required Spring framework jars. At a minimum you need to have the spring-core.jar, the spring-context.jar, and the spring-beans.jar from the Spring framework distribution. Also to avoid any run time errors you need the commons-logging.jar from the Apache Commons project in your class path.
Each of these jars provide a specific role that make using the Spring framework possible. First is the spring-core.jar; this jar is required for all Spring applications. It includes Spring's dependency injection classes as well as other classes that are used to create Spring beans. The spring-context.jar contains the ApplicationContext interface. This interface is used to start the Spring framework in my included example project.
The last Spring jar is the spring-beans.jar. It contains the DesposibleBean interface which the FileSystemXmlApplicationContext bean sub-interfaces. I do not directly use the DesposibleBean interface but I use the FileSystemXmlApplicationContext bean to located the XML file used to configure the Spring framework. The code that implements these classes is shown in Listing 6.
Wiring The Observer Pattern with Spring
To illustrate the Observer Pattern concretely, I chose to create a Town Crier class that sends messages to any registered Town Resident class. To keep this example simple, I developed the same interfaces shown in Figure 1, but the concrete classes are TownCrier and TownResident. All four of these classes are shown in Listings 1 through 4.
After I created the TownCrier (Listing 3) and two TownResident (Listing 4) classes I created an incomplete version the ObserverContext.xml file (Listing 5). This file contains the Spring definitions of the concrete implementation beans. Since this example is simple, I chose not to use any of the more complex attributes of the bean tag.
Typical Bean tags for the shown classes:
	<bean class="springobserver.TownCrier" id="townCrier"></bean>
	<bean class="springobserver.TownResident" id="townResident1"></bean>
	<bean class="springobserver.TownResident2" id="townResident1"></bean>
At this point, I was able to run my ExampleRun class (Listing 6), but nothing eventful actually happened. This is because the TownResident classes were not “wired” into the TownCrier class.
To perform the wiring of the Observer Pattern I chose to use Spring's MethodInvokingFactoryBean class. This process is a very simple way of calling a method on a class and ultimately passing a parameter into method. In this example, the parameter is the bean definition of a townResident. A snapshot of this bean definition is:
<bean class="org.springframework.beans.factory.config.MethodInvokingFactoryBean" id="registerTownResident1"></bean>
    <property name="targetObject"><ref local="townCrier"></ref></property>
    <property name="targetMethod"><value></value>addListener</property>
    <property name="arguments">
    <list></list>
      <ref bean="townResident1"></ref>

    </property>
As you can see, the targetObject is the townCrier bean, the targetMethod is the addListener method and the argument is the townResident1 bean. This configuration is the only code needed to compose the concrete implementations of the TownCrier with TownResident class.
Now that I have the beans wired together using the MethodInvokingFactoryBean class, I can run my ExampleRun class and see that my TownResident classes are receiving messages from the TownCrier class. Results shown in Example 1.
Conclusion
A few lessons learned in this article include a simple way to start the Spring framework, how to use the MethodInvokingFactoryBean, and an efficient implementation the Observer Pattern in the Spring framework. Since this is a minimal approach to the Spring framework, I was able to show the relationship between the ApplicationContext and it's implementation FileSystemXmlApplicationContext class. This process for starting Spring applications is a very easy way to leverage an incredible framework.
Part of this framework is the MethodInvokingFactoryBean. When using it you are free to employ any parameter available to you such as an Integer, a String, or in our case, another Spring bean. By allowing you to expose methods in your context xml files you can be as flexible as you can dream. This article has covered the addListener() method of the Observer Pattern. I would like to extend a challenge to you to figure out how to implement the removeListener() method using strictly the Spring framework.
Lastly, the Observer Pattern is a common and very useful pattern. The practices shown in this article provide an example of how the concrete implementation of the Observer interface can be developed with no additional coupling to the concrete implementation of the Subject interface. This feature of Spring encourages good object oriented design techniques. As a final note, there is really no reason developers and designers can not find ways to marry proven design patterns with beautifully developed frameworks.
Listing 1. The Observer Interface
package springobserver;
public interface Observer {
  public void update(String messageText);
}
Listing 2. The Subject Interface
package springobserver;
public interface Subject {
  public void addListener(Observer o);
  public void removeListener(Observer o);
  public void notifyListeners();
}
Listing 3. The Town Crier
package springobserver;

import java.util.ArrayList;
import java.util.Iterator;
import java.util.List;

public class TownCrier implements Subject {

	private List townResident = new ArrayList();
	private String messageText;

	// this message is added so I can give
	// this class a reason to call notifyListener.
	public void setMessage(String message){
		System.out.println("I'm the Town Crier and " +
				"I've got a message: " + message);
		this.messageText = message;
		this.notifyListeners();
	}

	public void addListener(Observer o) {
		this.townResident.add(o);
	}

	public void removeListener(Observer o) {
		if (this.townResident.contains(o)){
			this.townResident.remove(o);
		}
	}


	// call the update method on
	// each observer (town resident)
	public void notifyListeners() {
		for (Iterator iter = townResident.iterator(); iter.hasNext();) {
			Observer listener = (Observer) iter.next();
			listener.update(messageText);
		}
	}

}
Listing 4. The Town Residents
package springobserver;

public class TownResident implements Observer {
	public void update(String messageText) {
		System.out.println("Greetings my name is: " + this);
		System.out.println("I heard: " + messageText);
	}

-------- new class --------
package springobserver;

public class TownResident2 implements Observer {
	public void update(String messageText) {
		System.out.println("Greetings my name is: " + this);
		System.out.println("I heard: " + messageText);
	}

}
Listing 5. The Application Context XML (ObserverContext.xml)
<!---->
<!---->

<beans></beans>
	<!---->
	<bean class="springobserver.TownCrier" id="townCrier"></bean>

	<!---->
	<bean class="springobserver.TownResident" id="townResident1"></bean>

	<!---->
	<bean class="springobserver.TownResident2" id="townResident2"></bean>


     <!---->
    <bean class="org.springframework.beans.factory.config.MethodInvokingFactoryBean" id="registerTownResident1"></bean>
      <property name="targetObject"><ref local="townCrier"></ref></property>
      <property name="targetMethod"><value></value>addListener</property>
      <property name="arguments">
      <list></list>
        <ref bean="townResident1"></ref>

      </property>


     <!---->
    <bean class="org.springframework.beans.factory.config.MethodInvokingFactoryBean" id="registerTownResident2"></bean>
      <property name="targetObject"><ref local="townCrier"></ref></property>
      <property name="targetMethod"><value></value>addListener</property>
      <property name="arguments">
      <list></list>
        <ref bean="townResident2"></ref>

      </property>
Listing 6. Example Run
package springobserver;
import org.springframework.context.ApplicationContext;
import org.springframework.context.support.FileSystemXmlApplicationContext;

public class ExampleRun {
	public static void main(String[] args) {
		// launch the spring frame work.
		ApplicationContext ctx = new FileSystemXmlApplicationContext(
				"/config/ObserverContext.xml");
		// grab the Town Crier out of the spring
		// framework and send a message too all observers
		TownCrier crier = (TownCrier) ctx.getBean("townCrier");
		crier.setMessage("It is 1 O'Clock and all is well!");
	}
}
Example 1. System Output
I'm the Town Crier and I've got a message: It is 1 O'Clock and all is well!
Greetings my name is: springobserver.TownResident@80fa6f
I heard: It is 1 O'Clock and all is well!
Greetings my name is: springobserver.TownResident2@1b9ce4b
I heard: It is 1 O'Clock and all is well!!
分享到:


相关推荐
springloaded-1.2.6.RELEASE.jar
spring boot热部署之springloaded
springloaded-1.2.4.RELEAS
springloaded-1.2.5.RELEASE.jar 可实现java 程序的热部署
springloaded-1.2.5.RELEASE.jar
使用spring-loaded项目,确实可以实现java应用的热部署
springloaded-1.2.8.jar 拿去不谢。。。。。。。。。。。。。。。。。
springloaded spring-boot 热加载
具体描述在目录SpringloadedDemo\src\main\resources\static下
springloaded-1.2.4.RELEASE,springloaded-1.2.4.RELEASE
提高开发效率的利器,实现热加载,通过简单配置即可在eclipse或其他开发工具中实现热加载,尤其是对web开发,不用每次改动就手动重启服务器才能看到效果,使用这个工具包能实现即改即看到效果!
springloaded springboot 热加载
java文件修改后,热加载。不支持新增属性和方法的重编译加载。
spring-boot中使用springloaded实现热部署,添加依赖jar包 <groupId>org.springframework <artifactId>springloaded <version>1.2.7.RELEASE </dependency>
springboot热部署的依赖包,手动安装到maven库中;还需要更改开发工具的配置,具体配置请自行查找
JReble的替代产品springloaded: 允许你动态得新增/修改/删除某个方法/字段/构造方法,同样可以修改作用在类/方法/字段/构造方法上的注解.也可以新增/删除/改变枚举中的值。 压缩包中包含最新版本的springloaded和...
Spring Loaded和Vaadin启动项目命令行mvn install spring-boot:run并在浏览器中打开在IDE中启动项目选项1,从您的IDE启动spring-boot:run 选项2,启动Application类,在这种情况下,您需要下载springloaded.jar...
弹簧靴弹簧加载 博客文章示例
主要介绍了SpringBoot热部署Springloaded实现过程解析,文中通过示例代码介绍的非常详细,对大家的学习或者工作具有一定的参考学习价值,需要的朋友可以参考下